Bracket Fit
The adaptable option. Standard fish-mouth shroud brackets clamp onto the frame, so panels can be trimmed on site if you need to.
Step by step
Set out and install your posts
Mark your post centres and set your posts to suit your site - timber, slab, core drill or in-ground. Bracket Fit is more forgiving of slightly irregular spacing than Channel Fit, but plumb still matters.
Position your bottom brackets
Fix the bottom brackets first and get them level. These carry the panel and set your height off the ground - aim for the 80mm ground clearance.
Sit the panel on the bottom brackets
Rest the panel in place. Because the frame can be cut, a panel that's slightly long can be trimmed on site rather than re-ordered.
Clip in the top brackets
Fit the top brackets over the frame and onto the post. The fish-mouth shroud sits over the frame so the fixings are hidden.
Check your panel
Check the panel is level and sitting square before you fix off properly, then tighten everything down.
Repeat along the run
Move along the fence line, checking your ground clearance stays consistent as the ground changes.
The measurement that matters
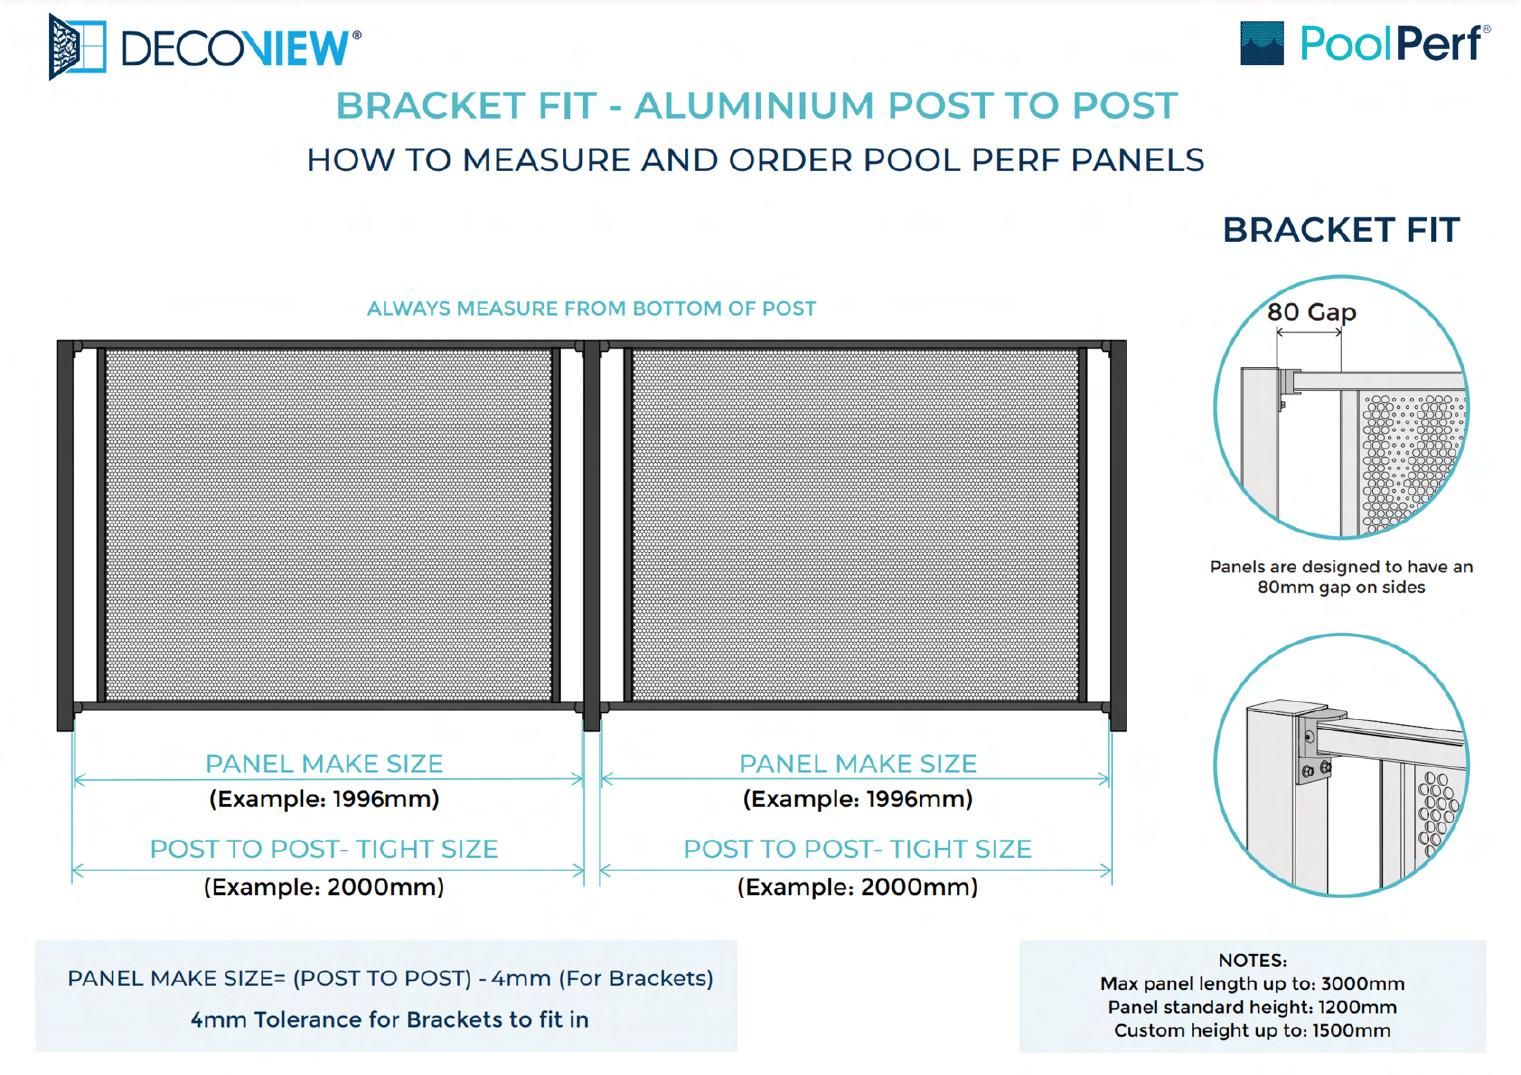
- Panel make size
- Post-to-post − 4mm
4mm tolerance for the brackets to fit in. Panels are designed with an 80mm gap either side. - Always measure
- From the bottom of the post - not the top.
- Max panel length
- 3000mm
- Panel height
- 1200mm standard · custom to 1500mm
Setting your posts
Choose the post type that matches your site. Everything else on this page is the same regardless.
Fixing to an existing timber deck or timber posts.
- Mark your post positions along the fence line, working from the bottom of the posts.
- Fix the base plate to the timber with appropriate structural fixings - check what you are fixing into is sound and load-bearing, not just decking board.
- Stand the post, plumb it with a level, and fix off.
- Repeat along the run, keeping your post-to-post spacing consistent with the sizes you ordered.
Base plates bolted down onto an existing concrete slab or paving.
- Set out and mark your post centres on the slab.
- Drill for masonry anchors using the base plate as your template.
- Bolt the base plate down, plumb the post and tighten off.
- Work along the run checking each post is plumb before moving on.
Coring into concrete and grouting the post in - the neatest result on a slab.
- Mark your post centres, then core drill each hole to the required depth.
- Vacuum the hole out and check the depth before you go any further.
- Set the post in, plumb it, and pack it so it cannot move.
- Grout the hole, wipe back any excess, and fit the cover ring for a clean finish.
- Let the grout cure fully before you hang panels off the posts.
Digging and concreting posts in - for garden and soft-ground runs.
- Set out the fence line and mark post centres.
- Dig each hole to the required depth and diameter for your soil conditions.
- Set the post, plumb it and brace it so it stays put.
- Concrete in, and check plumb again before the concrete goes off.
- Let the concrete cure before loading the posts with panels.
Watch it done
Four steps, then the whole job end to end.
Step 1 - Bracket Installation
Screw the brackets to the fence post.
Step 2 - Check Your Panel
Check the clip side faces the inside of the pool.
Step 3 - Bottom Brackets
Screw on the bottom brackets.
Step 4 - Clip In Brackets
Clip in, screw off, done.
Complete Bracket Panel Installation
The full Bracket Fit process in four easy steps.
Sloping or stepped ground
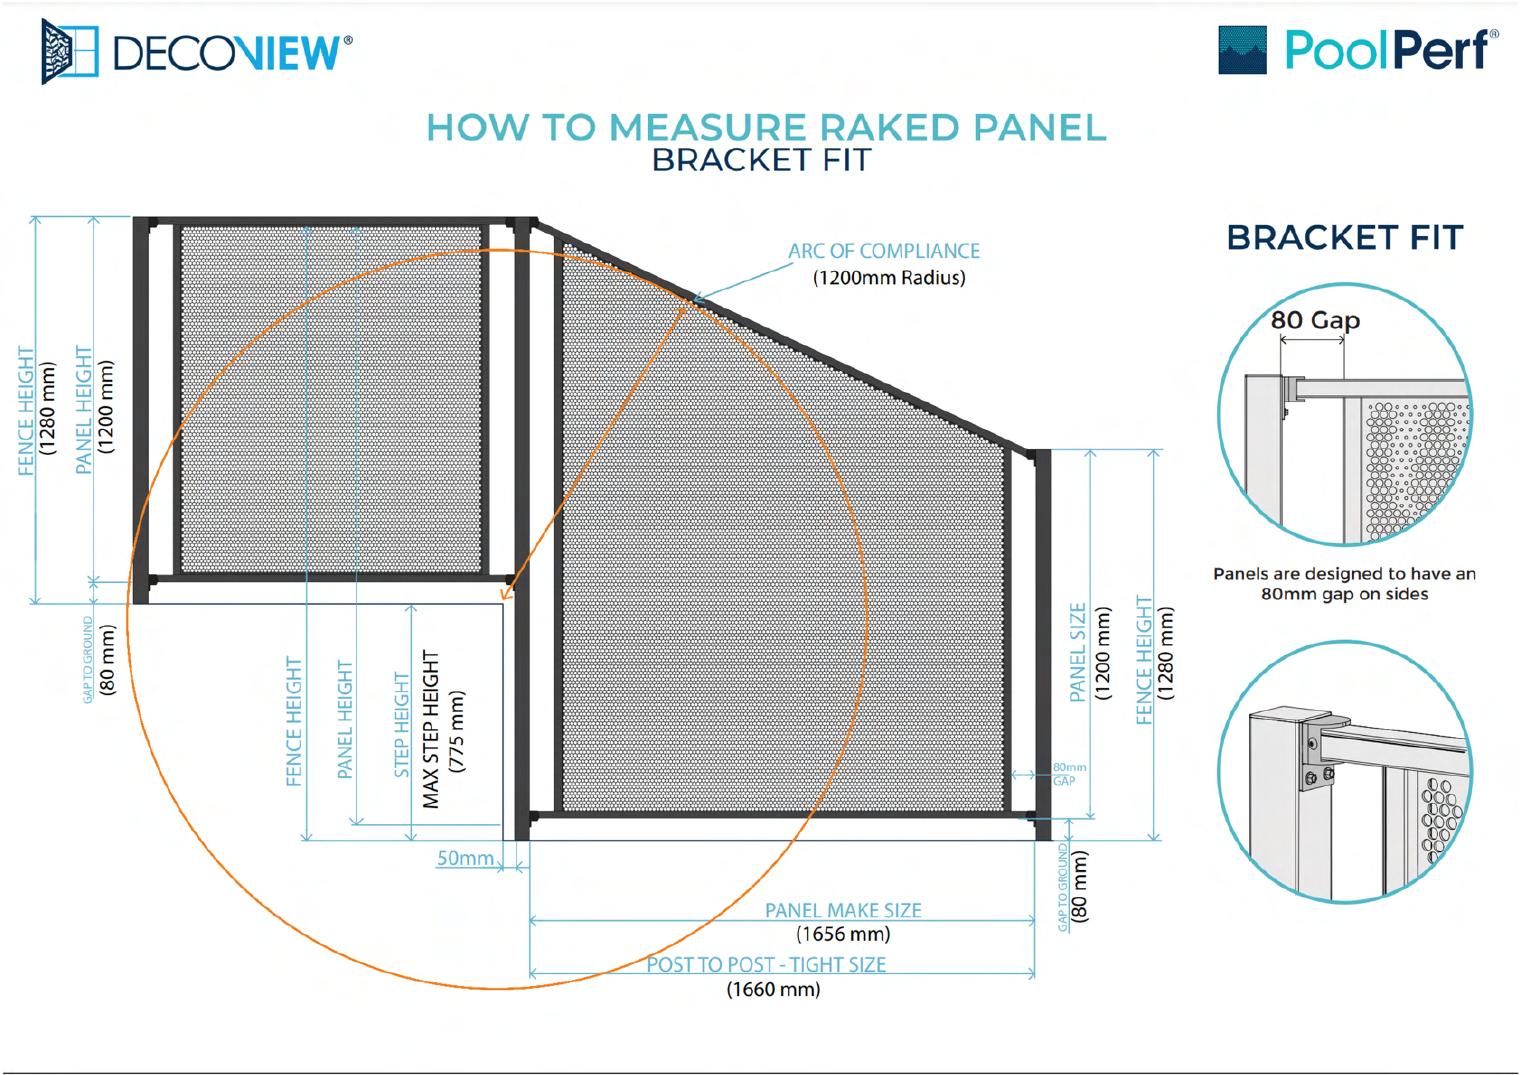
Where the land falls away, you need raked panels - panels manufactured with an angled top to follow the slope, rather than stepping square panels down and leaving gaps.
Two things have to stay true the whole way along: the barrier height, and the arc of compliance - a 1200mm radius arc that must stay clear of anything climbable.
- Arc of compliance
- 1200mm radius
- Max step height (Bracket Fit)
- 775mm
- Worked example
- Panel make size 1656mm from a 1660mm post-to-post span
- Fence height / gap to ground
- 1280mm total · 80mm gap to ground
Raked panels are made to your specific angle, so these measurements need to be right. If the fall is significant or you’re unsure, send us photos and measurements and we’ll check them before anything is manufactured.
Download the reference sheets
Decided it’s not for you?
No problem at all. If installing your own pool fence isn’t for you, we have many trusted and expert Trade Partners around Australia who are more than willing to lend a hand - licensed local installers who do this every week and handle the compliance side for you.
Ready to order your panels?
Give us your measurements and we’ll build and assemble them for you.
The manufacturer's drawings for Bracket Fit: components, specifications, post install and panel install, straight from the manufacturer’s manual. Read them on screen or take just that section with you.
Talk it through with a Pool Perf® specialist
Free, no obligation. Measuring, fixing method, gates, custom sizes and colours. Bring your numbers and we’ll work through them with you before you order.
Get Your Buyers Guide Now
- Current pricing, plainly set out
- The full design and colour range
- Channel Fit vs Bracket Fit, compared
- Measuring, gates and compliance